There is little we enjoy more than a seismic decorative transformation. Yup, we LOVE to juggle past and present to conjure up spells, and the bigger the "before and after" the better. Consider, if you will, this bathroom: a veritable den of designer no no's. An ergonomic, stylistic and visual wash out, with little in its favour, it desperately needed to change. Petite? To the power of ten. Carpet? The devil's own harbinger of human excretions, toe nails and mouse poop. Are we painting a picture?
It's fair to report that berber is our least favourite bathroom floor covering. To deal with the problem (pre reno') we -- literally -- wrapped our feet in shopping bags, tied off with elastic bands. We jest ye not: the plastic fantastic foot trick proved the ideal way in which to hermetically protect against germ infestation. Hey, even after cleaning the space a hundred times over, the Lady Macbeth "ick factor" still kicked in whenever we went near.
Tight proportions, however (not to mention the afore mentioned bilious berber) weren't our only issues as we washed the space of its grimy past. The beadboard was buckling -- and collapsing in parts -- and the plastic bath was scratched and dinged with compromised seals and all manner of attendant issues. Classic cottage cute? Hmm -- if your idea of "classic cottage cute" pertains to the set of Deliverance, perhaps.
To cut a long story short, it was a clunky affray with distinctly ominous olfactory issues. But it wasn't until pulling the bath out that we were able to pinpoint the source of the hellish aroma. The space behind the plastic shower walls, you see, had become a veritable mouse mausoleum: the determined rodents had been getting in, sure, but their passage back to freedom was hindered due to a bottleneck of decayed, insulating matter. Little wonder we swooned while pulling literally hundreds of fossilized rodents from the stinking scene.
But little, really, scares us. Ably assisted by our contractor, we rolled up our sleeves and, in a determined fit of pique, tore away the rotten two-inch by two-inch lumber, bleached the space clean, reframed, insulated and then covered everything in thick polythene to protect against further problems. Sure, our contracting arch angels (super builder Randy Blain and his team) are masters of their craft... but never let it be said we're anything less than excited to get stuck in.
Next stage of our grand master plan was to enlarge the tight room. The space being tiny, we grabbed a little square footage from a large double bedroom that lay through the wall. If you read our puff in last week's Huff' (where we turned similar tricks in our guest bedroom by borrowing inches from the closet and the kitchen) you'll appreciate that spatial trickery such as this makes all the difference. The mathematic appraisal is simple: a little space borrowed from a large room will likely go unnoticed, whereas the addition of a few more inches in a tiny space will make it feel thoroughly enlarged.
Hand in hand with our electricians, we selected neat ceiling mounted pot lights and, space being compromised, under floor heating. The latter meant we could dispense with the need for bulky baseboard radiators which meant visual streamlining was immediately improved. The Warm Up brand is a simple mesh system, laid prior to tile installation, it's both cost effective and energy efficient. Auspicious planning at this stage of your project (remember: "to fail to plan is to plan to fail!") makes for a cost effective life thereafter.
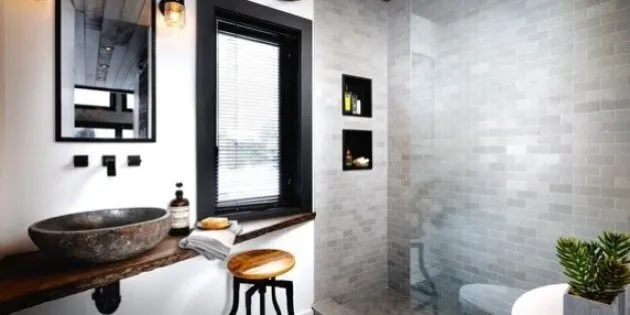
Our next challenge was to remove the small window. Wider and taller than its predecessor, the replacement tempts significantly more light into the previously gloomy bathroom. Finished in dramatic black, it's an eye-catching kick off point for subsequent project layers.
Further drama was played with the addition of a slimline Venetian blind (fitted into the rebate, not onto the frame: the former is far slicker) from Blinds To Go. Their "measure it yourself" service (the website gives exacting instruction so there's no room for error) is simple while collection from your nearest branch (and easy fit thereafter) makes overall specification a cinch.
Getting ever nearer the finish line, we set about waterproofing the zone and installing a "curb" onto which a fixed glazed panel was fitted. Saltillo graphite marble, installed by Plumbing Works in Bracebridge (floor and tile size mixed to add visual interest) proffers an indulgent feel, while dreamy ebony toned Rubinet taps and storage niches provide a handy stash zone for associated bathroom paraphernalia.
The following stage of our renovation was especially rewarding: that being the brand new bathroom surface. Holy Moly -- we LOVE this aspect of our scheme. The surprisingly simple installation started life as a slab of kiln dried live edged Hemlock sourced at Rebarn in Toronto's Black Creek.
To make best of the space under the window, we cut the Hemlock into a tapered wedge, to the left wider (to accommodate a Unikstone sink) and narrowed as it runs toward the shower stall. To "stabilize" the rough bark edge and the flat top surface, we gently sanded and then applied Varithane -- with low sheen -- to provide resilience against water penetration.
We've never made any secret of the fact we adore grey toned decorative schematics. And by now you know we tend to augment our keenness for grey with the addition of a further element. On one occasion we might fire in a zesty shot of yellow or, as is the case here, an organic "ingredient" or "layer" to immediately soften the completed vignette. In this regard, we installed a pine ceiling, stained to look like walnut. Further "softening" comes from the wooden topped "drop and lift" stool and the naturally shed antler found in the forest surrounding our cabin. It's all pretty sweet, huh? We're thrilled with the results and to this day the compact room remains one of our favourite cottage renovations during any season of Cabin Pressure.
And so our work is done. And the room has been totally transformed. Hard to believe it's the same space, huh? Guests who've already visited attest that it's a comfy nook where they feel indulged at every turn. Okay, so it ain't gonna win any prizes in a "world's largest bathroom" contest, but what it lacks in scale, it more than makes up for in style.
Colin and Justin's Cabin Pressure airs on Cottage Life at 9 p.m. on Sundays.
Catch up with all previous episodes at http://www.cottagelife.com
The Cottage Bathroom Before

The Shower Stall Is Created

Jason Gets Busy With the Tiling

Almost There...

Live Edge Timber Shelving, a Stone Sink and Soft Grey Tile -- a perfect cottage shower room recipe


ALSO ON HUFFPOST:
